Running Gemini Nano in Google Chrome doesn't require any data network.
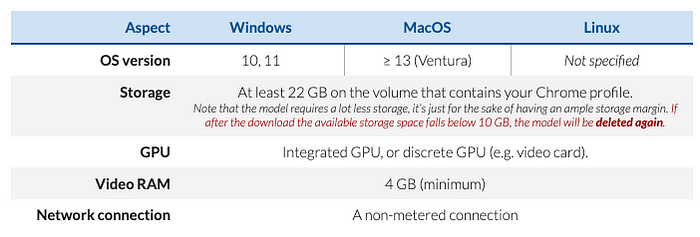
Requirements
A "desktop platform" with
- Recent operating system (OS) version
- 22+ GB on the volume that contains your Chrome profile.
- GPU
- 4 GB Video RAM
Download Google Chrome for Developers
To run Gemini Nano in Google Chrome you will have to download a special version of Google Chrome — Google Chrome for developers / Canary.
Download Google Chrome for Developers from Dev channel (or Canary channel), version at least 128.0.6545.0.
Check the version by typing chrome://version it into the URL bar and pressing Enter.
Enable Feature Flags & Check For Updates
Enable two feature flags :
- Prompt API — To send natural language instructions to an instance of Gemini Nano in Chrome.
- On-device model — To bypass performance checks that might get in the way of downloading Gemini Nano on your device.
On-device model Flag
Open a new tab in Chrome, go to chrome://flags/#optimization-guide-on-device-model
Select Enabled BypassPerfRequirement to facilitate a smooth download of Gemini Nano on your laptop.

Relaunch Google Chrome for Developers.
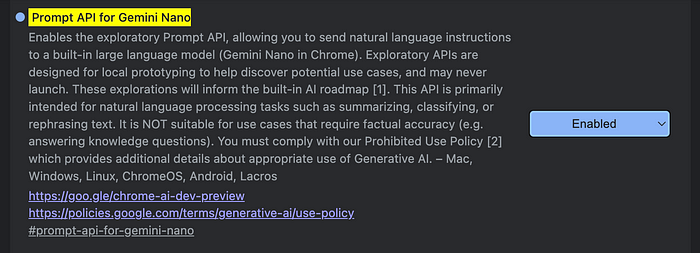
Prompt API Flag
Open a new tab in Chrome, go to chrome://flags/#prompt-api-for-gemini-nano to Enabled.
If you do not see "Optimization Guide On Device Model" listed, you may need to wait 1–2 days before it shows up (this was the case for me).
Relaunch Google Chrome for Developers.
Check For Updates
At this point, it's good to check for updates. As said above, this is an experimental feature and might change over time even with short notice.
Go to chrome://components and click "Check for Update" on "Optimization Guide On Device Model"
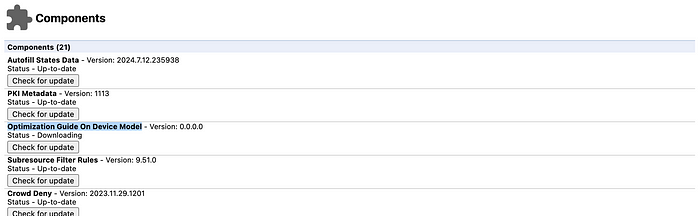
The version should be greater or equal to 2024.5.21.1031.
If you do not see "Optimization Guide On Device Model" listed, you may need to wait a few minutes or some hours (this was the case for me).
Once the model has downloaded go to the next step: Run Gemini Nano in Google Chrome.
Run Gemini Nano in Google Chrome
To verify that everything is working correctly, open the browser console e.g. DevTools (Shift + CTRL + J on Windows/Linux or Option + ⌘ + J on macOS) and run the following code:
(await ai.languageModel.capabilities()).available;If this returns "readily", then you are all set.
If it fails, we need to force Chrome to recognize that we want to use this API.
So, from the same console send the following code:
await ai.languageModel.create();This will likely fail but apparently it's intended.
Relaunch Google Chrome for Developers.
Then go through the Check For Updates section again.
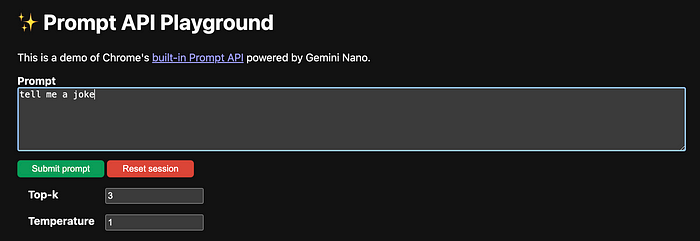
Use Gemini Nano With UI
At this point, you are ready to try the built-in version of Gemini Nano on Chrome for developers!
You can find an intuitive UI using the Chrome Dev Playground.
Use Gemini Nano APIs
Try out the API by simply using it in the browser console.
Start by checking if it's possible to create a session based on the availability of the model, and the characteristics of the device.
In the browser console, run:
const {available, defaultTemperature, defaultTopK, maxTopK } = await ai.languageModel.capabilities();

if (available !== "no") {
  const session = await ai.languageModel.create();

  // Prompt the model and wait for the whole result to come back.
  const result = await session.prompt("Tell me a German joke");
  console.log(result);
}
Built-in AI models guarantee certain benefits over using models online:
- Virtually Zero Costs
- Faster Response Time
- Offline availability
- Local processing of sensitive data
This early preview of Gemini Nano allows text interactions. Naturally, the quality of the output does not match the quality of bigger LLM models...
The core object is window.ai. It has three core methods:
canCreateTextSessioncreateTextSessiontextModelInfo
If you first check for window.ai, you could then use canCreateTextSession to see if AI support is really ready, if it iss on a supported browser and the model has been loaded. This does not return true, but... readily.
textModelInfo returns information about the model:
{
    "defaultTemperature": 0.800000011920929,
    "defaultTopK": 3,
    "maxTopK": 128
}
Finally: createTextSession.const model = await window.ai.createTextSession();
await model.prompt("Who are you?"); promptStreaming method is for working with a streamed response.Example:
<script defer src="https://cdn.jsdelivr.net/npm/alpinejs@3.x.x/dist/cdn.min.js"></script>

<h2>window.ai demo</h2>

<div x-data="app">
	<div x-show="!hasAI">
		Sorry, no AI for you. Have a nice day.
	</div>
	<div x-show="hasAI">
		<div class="row">
			<div class="column">
				<label for="prompt">Prompt: </label>
			</div>
			<div class="column column-90">
			<input type="text" x-model="prompt" id="prompt">
			</div>
		</div>
		<button @click="testPrompt">Test</button>
		<p x-html="result"></p>
	</div>
</div> document.addEventListener('alpine:init', () => { Alpine.data('app', () => ({ hasAI:false, prompt:"", result:"", session:null, async init() { if(window.ai) { let ready = await window.ai.canCreateTextSession(); if(ready === 'readily') this.hasAI = true; else alert('Browser has AI, but not ready.'); this.session = await window.ai.createTextSession(); } }, async testPrompt() { if(this.prompt === '') return; console.log(`test ${this.prompt}`); this.result = '<i>Working...</i>'; try { this.result = await this.session.prompt(this.prompt); } catch(e) { console.log('window.ai error', e); } } })) });
Text summarization:<script defer src="https://cdn.jsdelivr.net/npm/alpinejs@3.x.x/dist/cdn.min.js"></script>
<h2>window.ai demo</h2>
<div x-data="app">
<div x-show="!hasAI">
Sorry, no AI for you. Have a nice day.
</div>
<div x-show="hasAI">
<p>
<label for="inputText">Enter the text you would like summarized below:</label>
<textarea x-model="inputText" id="inputText"></textarea>
</p>
<button @click="testSummarize">Summarize</button>
<p x-html="result"></p>
</div>
</div>
 document.addEventListener('alpine:init', () => {
  Alpine.data('app', () => ({
    hasAI:false,
    inputText:"",
    result:"",
    session:null,
    async init() {
      if(window.ai) {
        let ready = await window.ai.canCreateTextSession();
        if(ready === 'readily') this.hasAI = true;
        else alert('Browser has AI, but not ready.');
        this.session = await window.ai.createTextSession();
      }
    },
    async testSummarize() {
      if(this.inputText === '') return;
      this.result = '<i>Working...</i>';
      try {
        let prompt = `Summarize the following text:

${this.inputText}`;
        this.result = await this.session.prompt(prompt);
      } catch(e) {
        console.log('window.ai error', e);
      }
    }
  }))
});
-------const session = await ai.languageModel.create();
// Prompt the model and wait for the whole result to come back.
const result = await session.prompt("Write me a poem.");
console.log(result);
// Prompt the model and stream the result:
const stream = await session.promptStreaming("Write me an extra-long poem.");
for await (const chunk of stream) {
console.log(chunk);
} System prompts
The language model can be configured with a special "system prompt" which gives it the context for future interactions:const session = await ai.languageModel.create({
systemPrompt: "Pretend to be an eloquent hamster."
});
console.log(await session.prompt("What is your favorite food?"));The system prompt is special, in that the language model
will not respond to it, and it will be preserved even if the context
window otherwise overflows due to too many calls to prompt().
If the system prompt is too large, then the promise will be rejected with a QuotaExceededError exception.
N-shot prompting
initialPrompts array. This aligns with the common "chat completions API" format of { role, content } pairs, including a "system" role which can be used instead of the systemPrompt option shown above. const session = await ai.languageModel.create({
initialPrompts: [
{ role: "system", content: "Predict up to 5 emojis as a response to a comment. Output emojis, comma-separated." },
{ role: "user", content: "This is amazing!" },
{ role: "assistant", content: "❤️, ➕" },
{ role: "user", content: "LGTM" },
{ role: "assistant", content: "👍, 🚢" }
]
});
// Clone an existing session for efficiency, instead of recreating one each time.
async function predictEmoji(comment) {
const freshSession = await session.clone();
return await freshSession.prompt(comment);
}
const result1 = await predictEmoji("Back to the drawing board");
const result2 = await predictEmoji("This code is so good you should get promoted");
(Note that merely creating a session does not cause any new responses from the language model. We need to call prompt() or promptStreaming() to get a response.)
Some details on error cases:
- Using both
systemPromptand a{ role: "system" }prompt ininitialPrompts, or using multiple{ role: "system" }prompts, or placing the{ role: "system" }prompt anywhere besides at the 0th position ininitialPrompts, will reject with aTypeError. - If the combined token length of all the initial prompts (including the separate
systemPrompt, if provided) is too large, then the promise will be rejected with aQuotaExceededErrorexception.
Customizing the role per prompt
prompt() and promptStreaming() with a single string. Such cases assume messages will come from the user role. These methods can also take in objects in the { role, content }
format, or arrays of such objects, in case you want to provide multiple
user or assistant messages before getting another assistant message: const multiUserSession = await ai.languageModel.create({
systemPrompt: "You are a mediator in a discussion between two departments."
});
const result = await multiUserSession.prompt([
{ role: "user", content: "Marketing: We need more budget for advertising campaigns." },
{ role: "user", content: "Finance: We need to cut costs and advertising is on the list." },
{ role: "assistant", content: "Let's explore a compromise that satisfies both departments." }
]);
// `result` will contain a compromise proposal from the assistant.
Emulating tool use or function-calling via assistant-role prompts
const session = await ai.languageModel.create({
systemPrompt: `
You are a helpful assistant. You have access to the following tools:
- calculator: A calculator. To use it, write "CALCULATOR: <expression>" where <expression> is a valid mathematical expression.
`
});
async function promptWithCalculator(prompt) {
const result = await session.prompt(prompt);
// Check if the assistant wants to use the calculator tool.
const match = /^CALCULATOR: (.*)$/.exec(result);
if (match) {
const expression = match[1];
const mathResult = evaluateMathExpression(expression);
// Add the result to the session so it's in context going forward.
await session.prompt({ role: "assistant", content: mathResult });
// Return it as if that's what the assistant said to the user.
return mathResult;
}
// The assistant didn't want to use the calculator. Just return its response.
return result;
}
console.log(await promptWithCalculator("What is 2 + 2?"));
All
of the above examples have been of text prompts. Some language models
also support other inputs. Our design initially includes the potential
to support images and audio clips as inputs. This is done by using
objects in the form { type: "image", content } and { type: "audio", content } instead of strings. The content values can be the following:
-
For image inputs:
ImageBitmapSource, i.e.Blob,ImageData,ImageBitmap,VideoFrame,OffscreenCanvas,HTMLImageElement,SVGImageElement,HTMLCanvasElement, orHTMLVideoElement(will get the current frame). Also raw bytes viaBufferSource(i.e.ArrayBufferor typed arrays). -
For audio inputs: for now,
Blob,AudioBuffer, or raw bytes viaBufferSource. Other possibilities we're investigating includeHTMLAudioElement,AudioData, andMediaStream, but we're not yet sure if those are suitable to represent "clips": most other uses of them on the web platform are able to handle streaming data.
Sessions that will include these inputs need to be created using the expectedInputs
option, to ensure that any necessary downloads are done as part of
session creation, and that if the model is not capable of such
multimodal prompts, the session creation fails. (See also the below
discussion of expected input languages, not just expected input types.)
const session = await ai.languageModel.create({
// { type: "text" } is not necessary to include explicitly, unless
// you also want to include expected input languages for text.
expectedInputs: [
{ type: "audio" },
{ type: "image" }
]
});
const referenceImage = await (await fetch("/reference-image.jpeg")).blob();
const userDrawnImage = document.querySelector("canvas");
const response1 = await session.prompt([
"Give a helpful artistic critique of how well the second image matches the first:",
{ type: "image", content: referenceImage },
{ type: "image", content: userDrawnImage }
]);
console.log(response1);
const audioBlob = await captureMicrophoneInput({ seconds: 10 });
const response2 = await session.prompt([
"My response to your critique:",
{ type: "audio", content: audioBlob }
]);
Future extensions may include more ambitious multimodal inputs, such as video clips, or realtime audio or video. (Realtime might require a different API design, more based around events or streams instead of messages.)
Details:
-
Cross-origin data that has not been exposed using the
Access-Control-Allow-Originheader cannot be used with the prompt API, and will reject with a"SecurityError"DOMException. This applies toHTMLImageElement,SVGImageElement,HTMLVideoElement,HTMLCanvasElement, andOffscreenCanvas. Note that this is more strict thancreateImageBitmap(), which has a tainting mechanism which allows creating opaque image bitmaps from unexposed cross-origin resources. For the prompt API, such resources will just fail. This includes attempts to use cross-origin-tainted canvases. -
Raw-bytes cases (
BlobandBufferSource) will apply the appropriate sniffing rules (for images, for audio) and reject with a"NotSupportedError"DOMExceptionif the format is not supported. This behavior is similar to that ofcreateImageBitmap(). -
Animated images will be required to snapshot the first frame (like
createImageBitmap()). In the future, animated image input may be supported via some separate opt-in, similar to video clip input. But we don't want interoperability problems from some implementations supporting animated images and some not, in the initial version. -
For
HTMLVideoElement, even a single frame might not yet be downloaded when the prompt API is called. In such cases, calling into the prompt API will force at least a single frame's worth of video to download. (The intent is to behave the same ascreateImageBitmap(videoEl).) -
Text prompts can also be done via
{ type: "text", content: aString }, instead of justaString. This can be useful for generic code. -
Attempting to supply an invalid combination, e.g.
{ type: "audio", content: anImageBitmap },{ type: "image", content: anAudioBuffer }, or{ type: "text", content: anArrayBuffer }, will reject with aTypeError. -
As described above, you can also supply a
rolevalue in these objects, so that the full form is{ role, type, content }. However, for now, using any role besides the default"user"role with an image or audio prompt will reject with a"NotSupportedError"DOMException. (As we explore multimodal outputs, this restriction might be lifted in the future.)
Structured output or JSON output
To help with programmatic processing of language model responses, the prompt API supports structured outputs defined by a JSON schema.
const session = await ai.languageModel.create();
const responseJSONSchemaObj = new AILanguageModelResponseSchema({
type: "object",
required: ["Rating"],
additionalProperties: false,
properties: {
Rating: {
type: "number",
minimum: 0,
maximum: 5,
},
},
});
// Prompt the model and wait for the json response to come back.
const result = await session.prompt("Summarize this feedback into a rating between 0-5: "+
"The food was delicious, service was excellent, will recommend.",
{responseJSONSchema : responseJSONSchemaObj}
);
console.log(result);
The responseJSONSchema option for prompt() and promptStreaming()
can also accept a JSON schema directly as a JavaScript object. This is
particularly useful for cases where the schema is not reused for other
prompts.
While processing the JSON schema, in cases where the user agent detects unsupported schema a "NotSupportedError" DOMException, will be raised with appropriate error message. The result value returned is a string, that can be parsed with JSON.parse(). If the user agent is unable to produce a response that is compliant with the schema, a "SyntaxError" DOMException will be raised.
Configuration of per-session parameters
In addition to the systemPrompt and initialPrompts options shown above, the currently-configurable model parameters are temperature and top-K. The params() API gives the default and maximum values for these parameters.
const customSession = await ai.languageModel.create({
temperature: 0.8,
topK: 10
});
const params = await ai.languageModel.params();
const conditionalSession = await ai.languageModel.create({
temperature: isCreativeTask ? params.defaultTemperature * 1.1 : params.defaultTemperature * 0.8,
topK: isGeneratingIdeas ? params.maxTopK : params.defaultTopK
});
https://github.com/webmachinelearning/prompt-api


